Ombre brows have become a popular choice for those seeking defined and long-lasting eyebrows. This semi-permanent makeup technique involves depositing pigment into the skin to create a soft, gradient effect. However, after the initial procedure, scabbing and healing are part of the process. In this article, we will explore the stages of healing for scabby ombre brows, providing insights into what to expect during the recovery period.

Stage 1: The Freshly Inked Brows
The Freshly Inked Look Immediately after the ombre brow procedure, your brows will appear darker and more defined than your desired outcome. This is completely normal and should not be a cause for concern. The pigment applied to the skin needs time to settle and heal, so it’s important to avoid touching, scratching, or picking at your brows during this stage. Your technician will provide you with aftercare instructions to ensure proper healing.
Stage 2: Scab Formation
The Scabbing Phase Around days 3 to 5, the healing process begins, and scabbing starts to occur. Small, fine scabs may form on the treated area, which can cause the eyebrows to appear darker and thicker during this stage. Also, It’s crucial to resist the temptation to pick or scratch at the scabs, as it can lead to pigment loss and potential scarring. Moreover, Allow the scabs to shed off on their own naturally.
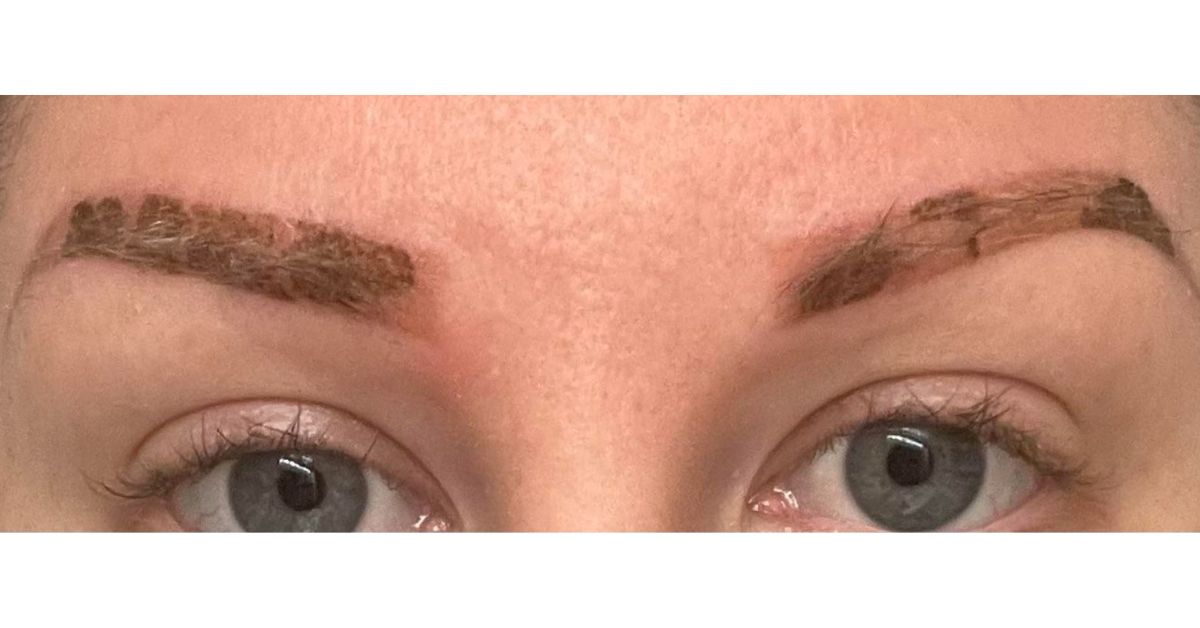
Stage 3: Flaking and Peeling
The Flaking and Peeling Stage Between days 5 to 10, the scabs will start to flake and peel away, revealing a lighter shade of your ombre brows. However, Some itchiness or dryness might accompany this stage. Furthermore, It’s essential to resist scratching or forcefully removing any flakes, as this can disrupt the healing process and affect the outcome. Moreover, Applying a recommended post-care ointment or moisturizer can help alleviate any discomfort during this phase.
Stage 4: Settling and Fading
The Settling Period By the end of the second week, your ombre brows will have settled into their final shade. The pigment may appear slightly lighter than immediately after the procedure, but this is normal. Here, Some areas may have experienced more pigment loss than others, but a touch-up session can address any unevenness or gaps. Furthermore, Avoid exposing your brows to excessive sunlight or moisture during this stage to ensure optimal healing and color retention.
Stage 5: The Final Reveal
The Final Outcome Around 4 to 6 weeks after the initial procedure, you will achieve the outcome of your scabby ombre brows. The color will have fully developed and stabilized, giving you the beautiful, natural-looking brows you desire. It’s important to note that everyone’s healing process is unique, and individual results may vary. Regular touch-up sessions are recommended to maintain the desired color and shape.
Read Also
Ombre Brows vs Powder Brows: Exploring Techniques & Differences
Microfeathering Eyebrows: Enhancing Your Natural Beauty
Tips for a Successful Healing Process
- Avoid scratching or picking at scabs, as this can disrupt the healing process and increase the risk of infection or scarring.
- Refrain from excessive rubbing or touching of your brows to prevent pigment loss, infection, or scarring.
- Limit exposure to sweating and sunlight, as these can slow down the healing process. Also, Protect your brows from direct sunlight and avoid activities that cause excessive sweating during the first 10 days of recovery.
- During the initial 10-day healing period, avoid excess water, makeup, lotions, and sun exposure. Moreover, Keep your brows dry and refrain from applying makeup or lotions to prevent potential complications.
- Practice patience as the healing process for scabby ombre brows can take several weeks. Initially, your brows may appear darker and more intense before fading to the desired shade. Allow the healing process to proceed naturally without rushing the results.

Conclusion:
The healing stages of scabby ombre brows can be an exciting yet challenging process. It’s crucial to follow your technician’s aftercare instructions diligently to ensure proper healing and achieve the best results. Remember to be patient and avoid any activities that may disrupt the healing process. With time, you will enjoy the benefits of beautifully defined and long-lasting ombre brows that enhance your natural features.
FAQ’s
To get rid of scabs on your eyebrows: Avoid scratching or picking at the scabs.
Use dandruff shampoo for eyebrow dandruff or seborrheic dermatitis.
Consult a healthcare provider if the scabs persist.
Avoid new substances that may cause contact dermatitis.
Follow aftercare instructions for microblading or powder brows.
The healing process of eyebrows can vary, but here is a general overview:
Immediate post-treatment: Redness, swelling, and sensitivity may occur.
First few days: Scabbing may happen, and it’s important to avoid picking at the scabs.
First week: Redness, tenderness, and mild swelling may persist.
2-4 weeks: Healing continues, and eyebrow color may appear darker initially.
4-6 weeks: The healing process is typically complete, and the final look of the eyebrows is revealed.
Mixed opinions exist on using Vaseline for micro-bladed eyebrows:
Some artists recommended it for aftercare, but concerns have emerged.
Vaseline can act as a barrier cream, but its effect on fading tattooed or microbladed eyebrows is uncertain.
Alternatives like exfoliating or saline solutions may be needed, with professional guidance advised. Consulting a microblading artist or healthcare professional is crucial